Introduction
When managing your Git repositories, there can be situations where you are required to sever ties with a remote origin. Whether you’re reorganizing your project structure or transitioning to a new hosting platform, removing a remote origin is a common task. In this blog, we’ll explore two straightforward options for achieving this: one through the command line and the other by directly editing the Git configuration file.
Option 1: Eliminate a Git Remote Employing Command Line

The command line provides a swift and efficient avenue for managing Git operations. When it comes to removing a remote origin, this process can be executed seamlessly through the following steps:
Open Your Terminal or Command Prompt:
Launch your terminal or command prompt. This is where you’ll input the commands to connect with your Git repository.
Navigate to Your Local Repository:
Utilize the cd command to navigate to the root directory of your local Git repository. This ensures that the subsequent Git commands will apply to the correct repository.
cd path/to/your/local/repository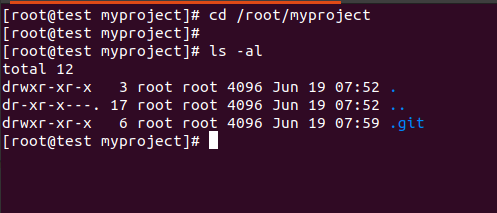
Replace “path/to/your/local/repository” with the actual path to your repository.
Execute the Removal Command:
Now, execute the command to remove the remote origin. Use the following command:
git remote remove origin
This command effectively severs the connection between your Git repository and the remote named “origin.” If your remote has a different name, substitute “origin” with the actual remote name.
By implementing the above steps, you have effectively removed the remote origin using the command line. This option is especially advantageous when you prefer a concise and direct method for managing your Git configurations.
Exploring the Command Line Option in Depth:

Let’s delve a bit deeper into each step to provide a more comprehensive understanding of the process.
Opening the Terminal:
The terminal or command prompt serves as your gateway to executing commands on your computer. By opening it, you gain access to a powerful interface where you can interact with the underlying system and, in this case, your Git repository.
Navigating to the Local Repository:
Once the terminal is open, the cd command is employed to change the current working directory. Navigate to the root directory of your local repository. This step is crucial to ensure that the subsequent Git commands are applied to the correct repository.
Executing the Removal Command:
The heart of the operation lies in the git remote remove command. This command, followed by the name of the remote (in this case, “origin”), removes the specified remote from your repository configuration.
Now, let’s address some scenarios and considerations related to this command:
Different Remote Name:
If your remote is named differently, replace “origin” with the actual name of your remote. This flexibility assures that the command complements to various repository configurations.
git remote remove custom_remote_nameVerification:
After executing the removal command, it’s prudent to confirm its success. You can do this by checking the list of remotes associated with your repository using the following command:
git remote -v
Ensure that the remote you intended to remove is no longer listed.
This detailed exploration illuminates the simplicity and effectiveness of the command line approach in removing a Git remote. It empowers you to streamline your Git configuration with just a few keystrokes.
Option 2: Eliminate a Git Remote by Editing the Configuration File

While the command line provides a direct method, some users might prefer a more manual approach. Editing the Git configuration file offers a different perspective on removing a remote origin.
Locate the .git Directory:
Begin the process by navigating to the .git directory within your local repository. The .git directory serves as the nerve center of your Git repository, containing essential configuration files and information.
cd path/to/your/local/repository/.git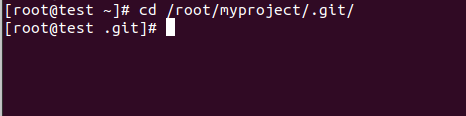
Replace “path/to/your/local/repository” with the actual path to your repository.
Open the Configuration File:
Inside the .git directory, you will locate the config file. This file keeps vital configuration settings for your Git repository. Open it employing a text editor of your preference. Whether you prefer command-line editors like nano or graphical editors like Visual Studio Code, the choice is yours.
nano configThis command opens the config file in the nano editor. If you have a preferred text editor, replace nano with its name.
Locate and Delete the “origin” Section:
Within the config file, identify the section that begins with [remote “origin”]. This section contains configuration settings specific to the “origin” remote.
Delete the entire section, including all lines related to the “origin” remote. Save the modifications and exit the text editor.
The removed section should resemble the following:
[remote "origin"]

url = https://github.com/your-username/your-repository.git

    fetch = +refs/heads/*:refs/remotes/origin/*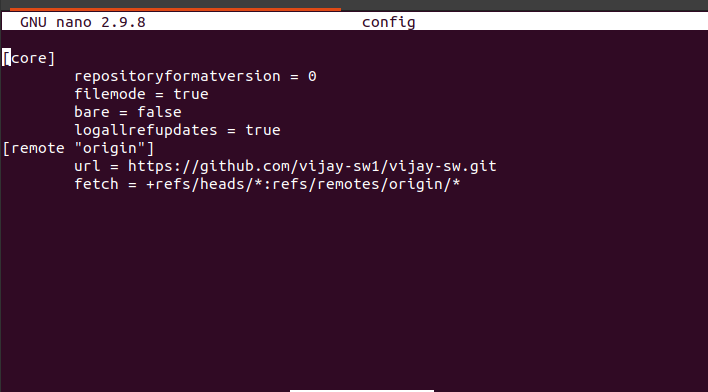
After deletion, the section will no longer be present in the config file.
By performing these steps, you manually remove the remote origin configuration from the Git configuration file. This method provides a hands-on experience for users who prefer a more controlled and precise approach.
Understanding the Manual Editing Process:
Locating the .git Directory:
The .git directory is vital for Git’s internal operations, housing configuration files, object databases, and other essential components. Navigating to this directory grants direct access to the core of your Git repository.
Opening the Configuration File:
The config file within the .git directory holds the repository’s configuration settings. Opening this file enables you to view and modify these settings. Whether you choose command-line editors like nano or graphical editors like Visual Studio Code, the flexibility lies in your hands.
Locating and Deleting the “origin” Section:
Within the config file, the [remote “origin”] section is specific to the configuration of the “origin” remote. Identifying and deleting this section eradicates all traces of the “origin” remote from the configuration.
Now, let’s address some considerations and potential scenarios related to manual file editing:
Backup:
Before making any changes, creating a backup of the config file is advisable. This precaution assures that you are able get back to the previous state in case required.
cp config config_backup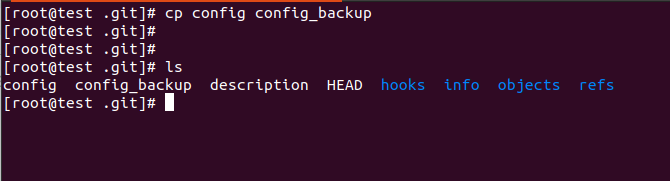
This command creates a copy of the config file named config_backup.
Editing with Different Text Editors:
The choice of a text editor is subjective. Whether you use nano, vim, or a graphical editor, ensure you’re comfortable with the tool. Use the appropriate command to open the file in your desired editor.
nano config
In place of “nano” edit your preferred text editor.
Verification:
After saving the changes, confirm the success of the operation by checking the list of remotes:
git remote -v
Ensure that the “origin” remote is no longer listed.
This detailed exploration of manual editing provides insight into the meticulous control offered by this approach. It caters to users who appreciate a hands-on method of configuring their Git repository.
Additional Insights and Considerations:
Now, let’s expand on the topic by discussing additional insights and considerations that can enhance your understanding of removing a Git remote by editing the configuration file.
Understanding Git Remotes:
Git remotes are essential for collaboration and version control. They allow you to connect your local repository to a remote repository, facilitating the exchange of changes between contributors.
When removing a remote, whether through the command line or manual editing, it’s crucial to understand the implications. Removing a remote severs the link between your local repository and the remote repository. This action does not delete the remote repository itself; it simply disassociates it from your local copy.
Security Considerations:
If the remote repository becomes compromised or if you need to restrict access to certain collaborators, removing the remote can be a prudent measure.
Before making such decisions, it’s essential to connect with your team and assure that each one knows about the modifications. Additionally, consider implementing access controls and regularly reviewing the list of remotes to maintain a secure and well-managed Git environment.
Collaborative Workflows:
For teams working on collaborative projects, a well-defined Git workflow is crucial. Removing a remote might be part of a larger strategy, such as migrating to a new hosting platform or restructuring the project. It’s advisable to communicate these changes clearly and document the reasons behind them.
Collaborative workflows often involve multiple branches, pull requests, and continuous integration. Ensure that your team is aligned on the steps involved in removing a remote to avoid disruptions to the workflow.
Advanced Configuration Settings:
While the focus of this guide has been on removing the remote origin, Git supports more advanced configuration settings for remotes. These settings include specifying the fetch and push URLs, configuring push behavior, and setting up remote tracking branches.
For users seeking a deeper level of customization, exploring these advanced settings can provide a nuanced understanding of how Git manages remote repositories. However, these settings should be approached with caution, and changes should be made with a clear understanding of their impact on the repository.
Version Control Best Practices:
Removing a Git remote is just one aspect of version control best practices. It’s part of a larger picture that includes branching strategies, commit hygiene, and effective use of pull requests. Familiarizing yourself with these best practices ensures a hassle-free version control operation for your projects.
Remove the origin Remote
Whichever option you choose, it’s crucial to verify the success of the operation. To confirm that the remote origin has been removed, use the following command:
git remote -v
This command displays the configured remotes for your repository. Ensure that the “origin” remote is not listed anymore.
Ensuring the Success of Remote Removal:
Verifying the removal of the “origin” remote is a critical step in maintaining a clean and organized Git repository. Let’s delve into this verification process and understand why it matters.
Understanding the git remote -v Command:
The git remote -v command is a powerful tool that provides a comprehensive view of the configured remotes for your Git repository. This includes both the fetch and push URLs associated with each remote.
When you execute this command, Git responds by listing the names and URLs of the remotes, making it easy to confirm whether the removal of the “origin” remote was successful.
git remote -vHere, “v” stands for “verbose,” and it ensures that the command provides detailed output, showing both the fetch and push URLs for each remote.
Confirmation of “origin” Removal:
Upon executing the git remote -v command, carefully inspect the output. If the removal of the “origin” remote was successful, you should not find any entries related to “origin” in the list of remotes.
A sample output might look like this:
custom_remote https://github.com/your-username/your-repository.git (fetch)
custom_remote https://github.com/your-username/your-repository.git (push)
In this example, “custom_remote” is used as a placeholder for any other remote names you might have. The absence of any lines mentioning “origin” confirms that the remote has been successfully removed.
The Importance of Verification:
Failing to verify the removal of the “origin” remote could lead to unintended consequences, especially if you are making significant changes to your repository’s configuration.
Here are some reasons why verification is essential:
Preventing Configuration Mishaps:
Verifying the removal of the “origin” remote ensures that the intended changes have been applied to your Git configuration. This prevents accidental mishaps, such as removing the wrong remote or overlooking a step in the removal process.
Avoiding Operational Disruptions:
In collaborative development environments, operational disruptions can be costly. Confirming the success of the removal ensures that team members are not inadvertently cut off from the repository or experience disruptions in their workflow.
Maintaining a Clean Repository:
A clean and well-maintained repository is crucial for efficient version control. Verifying the removal of the “origin” remote contributes to a streamlined and organized repository structure.
Troubleshooting Potential Issues:
If there are any issues or unexpected behavior after the removal, verification helps in troubleshooting. You can quickly identify whether the “origin” remote is still present or if there are any remnants causing conflicts.
Potential Challenges and Solutions:
While the removal process is typically smooth, there can be situations where challenges arise. Apprehending these challenges and acquiring solutions is beneficial for a seamless Git management experience.
Incomplete Removal:
In some cases, the removal process might not be entirely successful. The “origin” remote might still appear in the list of remotes even after executing the removal command.
Solution:
Double-check the steps involved in the removal process. Ensure that you followed each step accurately, whether through the command line or manual editing. If needed, repeat the removal steps to ensure completeness.
Dependencies on “origin” Remote:
If other branches, configurations, or operations depend on the “origin” remote, removing it might lead to unexpected issues.
Solution:
Before removing the “origin” remote, analyze the dependencies within your repository. If there are branches or configurations tied to “origin,” consider adjusting them accordingly.
Backup and Rollback:
If uncertainty persists or if you are making substantial changes to your repository, having a backup is a prudent practice.
Solution:
Before initiating the removal, create a backup of your repository or configuration files. This backup provides a safety net, permitting you to rollback changes if needed.
Also Read: How to Check the Kernel Version in Linux Using the Command Line?
Conclusion
In this blog post, we explored two effective methods for removing a remote origin from a Git repository. Whether you prefer the convenience of the command line or the precision of manual configuration file editing, both options lead to the same result. Choose the approach that aligns with your workflow and project requirements, and enjoy a cleaner Git setup without the unwanted remote origin.
Remember to adapt these methods based on your specific needs, and always make sure to have a backup of your repository before making significant changes. Happy coding!