Introduction
Welcome to our step-by-step guide on installing PIP on Windows for Python. If you’re new to the world of Python, don’t worry—we’ve got you covered. In this blog, we’ll walk you through the process to install PIP on Windows 10, making it a breeze to manage your Python packages efficiently.
What is Python?
Python implies a high-level, interpreted programming language known for its simplicity as well as dependability. Guido van Rossum created Python in 1991, and since then, it has turned out to be the most prevalent employed language in various fields, from web development to scientific research and AI. Here’s a concise exploration of Python’s key attributes:
- Readability and Simplicity: Python stands out for its simple and easily understandable syntax, making it accessible to both beginners and seasoned developers.
- Versatility: Supporting numerous programming paradigms such as procedural, object-oriented, and functional programming, Python offers developers the versatility to pic the aptest approach for their projects.
- Extensive Standard Library: With a comprehensive standard library, Python provides a rich set of modules and packages for diverse tasks, minimizing the need for developers to create code from scratch and enhancing overall productivity.
- Web Development Frameworks: Python’s influence in web development is obvious via frameworks such as Flask, Django, etc. Django simplifies the creation of robust web applications, while Flask offers flexibility and simplicity, catering to projects of various scales.
- Data Science and Machine Learning: Python has come up as a cornerstone in DSML. Libraries like NumPy, Pandas, and Matplotlib empower data scientists, and frameworks such as TensorFlow and PyTorch leverage Python for advanced ML models.
- Vibrant Community: Python’s strength lies in its vibrant and collaborative community, providing developers with a plethora of resources including online documentation, forums, and tutorials. This community-driven methodology guarantees continuous enhancement and innovation.
- Automation and Scripting: The simplicity and versatility of Python shine in automation and scripting. Developers choose Python for creating scripts that automate tasks like system administration, data processing, and other repetitive processes.
- Readily Available Resources: Python developers have access to a wealth of resources, contributing to the language’s popularity. Abundant documentation, tutorials, and community support facilitate learning and problem-solving.
- Regular Updates and Features: Python’s commitment to regular updates and feature additions keeps the language dynamic and aligned with evolving industry needs. This ensures Python stays at the front of technological progression.
How to Install PIP on Windows 10?
Follow these simple steps to install PIP on your Windows 10 system and enhance your Python experience:
Step 1: Install Python on Windows 10
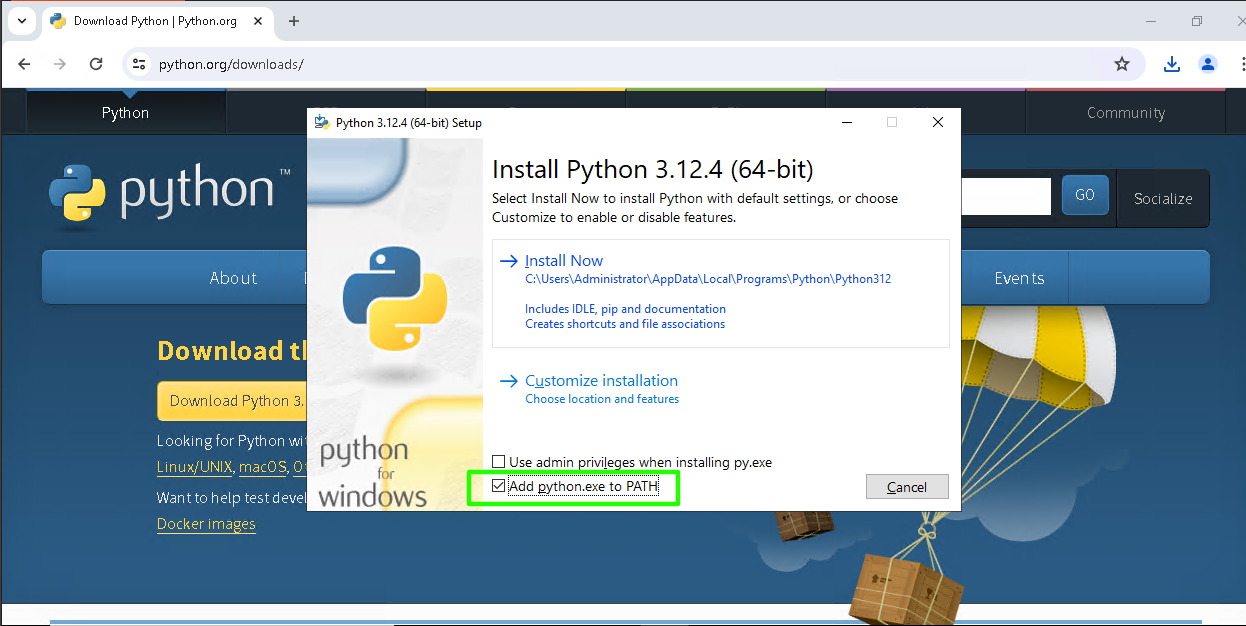
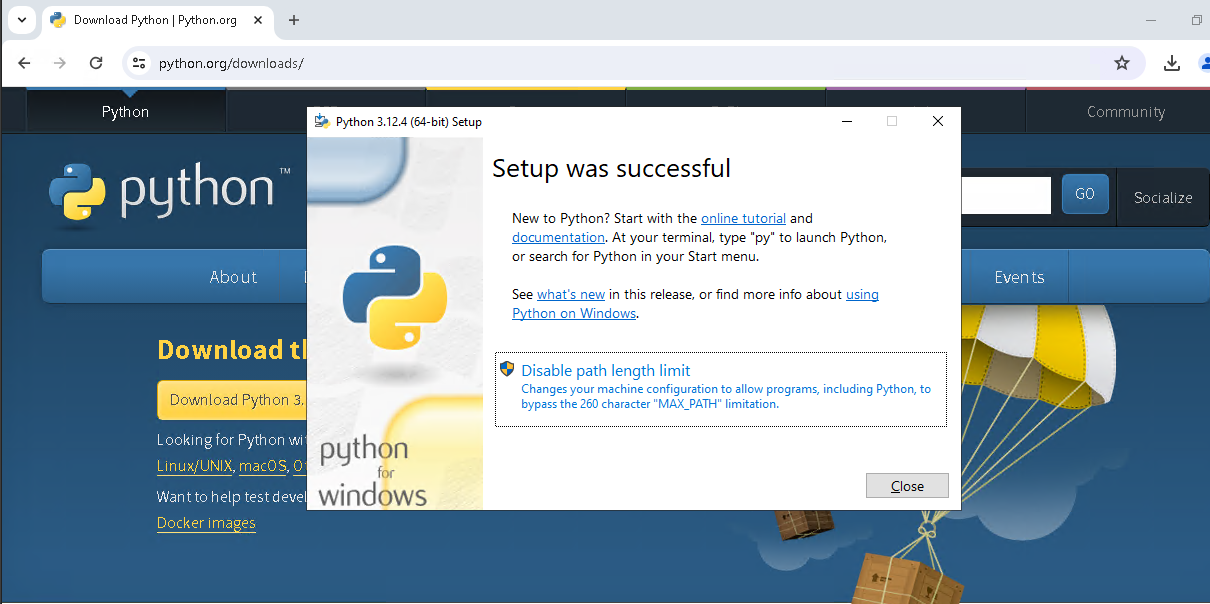
Embarking on your Python journey begins with installing Python on your Windows 10 machine. The process is easy & user-friendly. Start by navigating to the official Python website at python.org.
While installing Python, pay close attention to a crucial option – “Add Python to PATH.” Ensure this checkbox is selected during installation, as it plays a pivotal role in the subsequent PIP installation process. Adding Python to PATH allows your system to recognize Python as a command, making it accessible from any command prompt window.
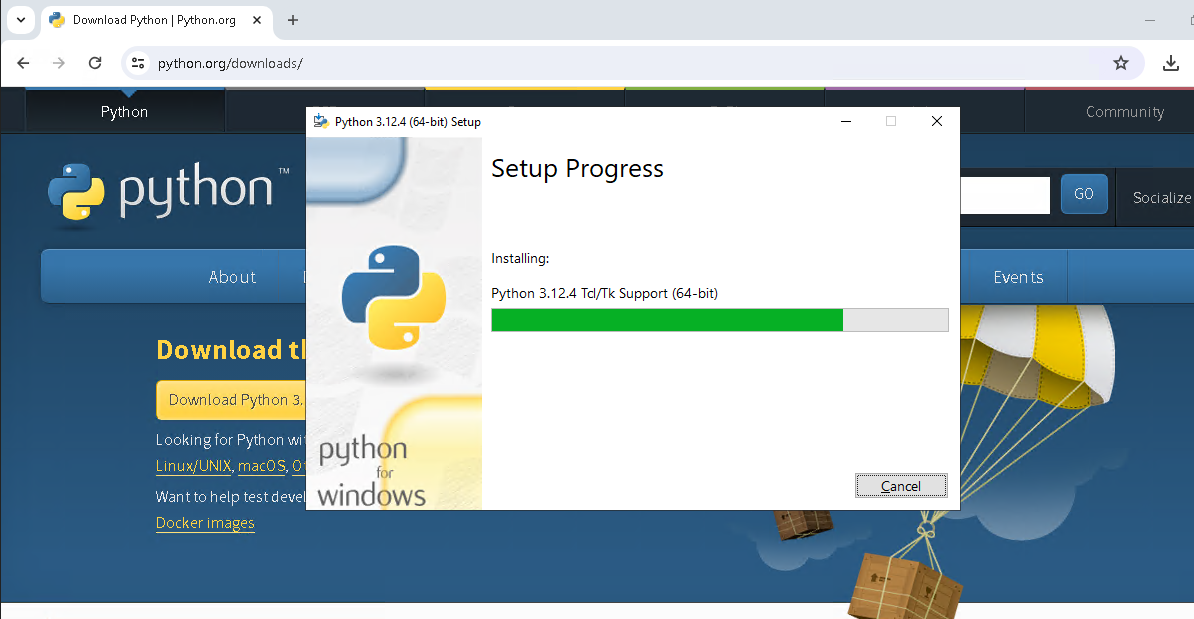
Once the installation is complete, you’ve laid the foundation for a seamless Python experience on your Windows 10 system. This step ensures Python is properly set up and sets the stage for effortlessly incorporating PIP into your Python environment.
Now that Python is installed and configured, let’s move on to the next steps in our journey to install PIP on Windows. This will enable you to efficiently manage Python packages for your projects, enhancing your overall development experience.

Step 2: Open Command Prompt
Now that Python is successfully installed on your Windows 10 system, let’s move on to the next step: opening the Command Prompt. This step is crucial as it serves as the gateway to the command-line interface, allowing you to execute commands necessary for PIP installation.
To access the Command Prompt, simply navigate to the Windows Start menu and search for “cmd.” As soon as you locate the Command Prompt, click on it to open the command-line interface. Alternatively, you can press the ‘Windows key + R’ to open the Run dialog, type “cmd,” and then, press Enter.
The Command Prompt renders a text-based interface where you can interact with your system by typing commands. It’s the command-line powerhouse that empowers you to perform various tasks, from navigating directories to executing Python scripts.
As we proceed, we’ll leverage the Command Prompt to verify the Python installation and execute essential commands for downloading and installing PIP on your Windows machine.
Feel free to explore the command-line capabilities of the Command Prompt as you follow along. The command-line interface is a powerful tool that extends beyond Python, offering a versatile environment for system interactions. As we progress, you’ll not only install PIP but also gain valuable insights into using the Command Prompt for various tasks in your coding journey.
Step 3: Verify Python Installation
It’s crucial to verify that Python has been installed correctly on your Windows 10 machine. This step ensures a solid foundation for the subsequent steps, assuring that your Python environment is ready for seamless package management.
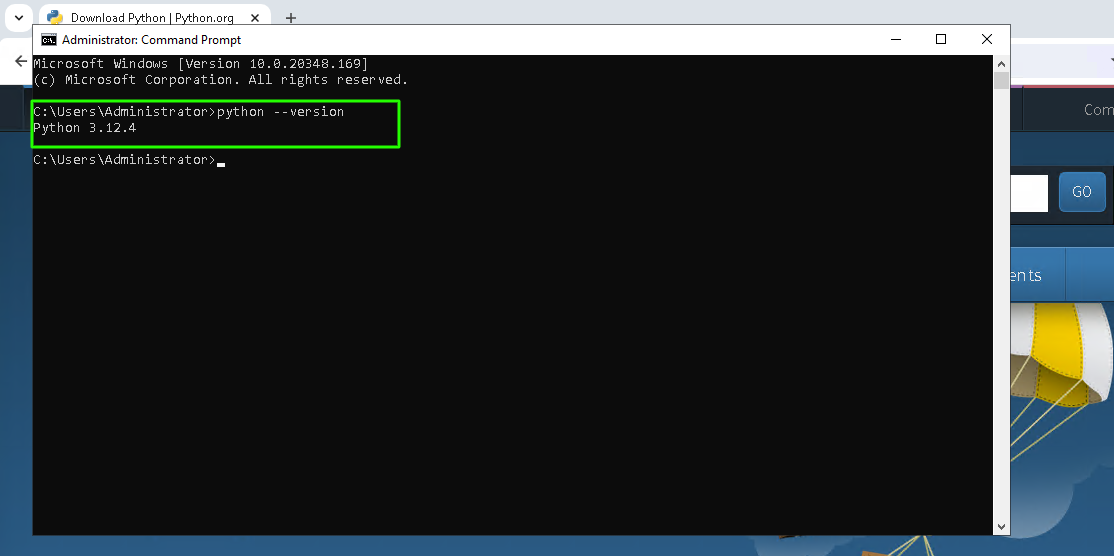
Under the Command Prompt, type the given below command:
python --versionExecuting this command serves as a quick check to confirm the successful installation of Python and to retrieve information about the installed Python version. This version verification step is essential, as it provides insight into the compatibility of Python with your system.
If the command displays the installed Python version without any errors, you are on the apt track, and your Python installation is intact. However, if you encounter any issues or if the command is not recognized, it may indicate a problem with the installation. In such cases, revisiting the installation steps or seeking assistance online can help resolve any issues.
With a confirmed and verified Python installation, you’re now well-prepared to proceed with the next steps in our guide to install PIP on Windows. This verification step acts as a checkpoint, ensuring a smooth progression towards setting up PIP for efficient Python package management.
Step 4: Download PIP for Windows
Now that we’ve verified a successful Python installation, let’s proceed to the next crucial step in our journey to install PIP on Windows 10 – downloading the PIP installation script. This script, named get-pip.py, is the key to seamlessly integrating PIP into your Python environment.
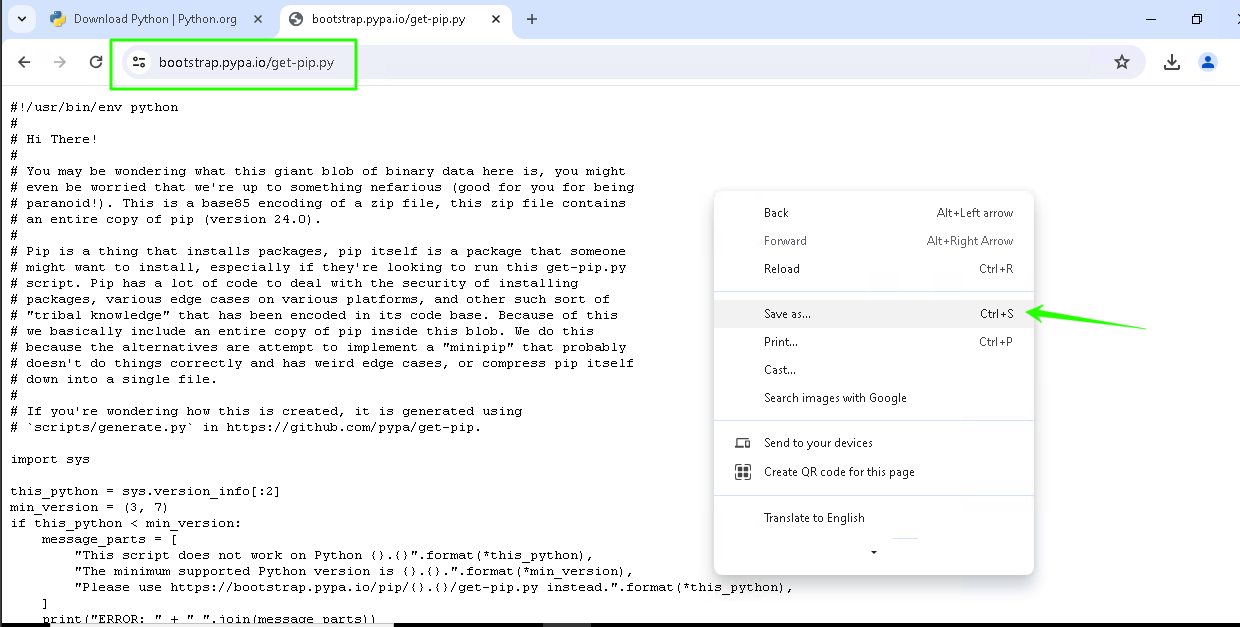
To obtain the get-pip.py script, open your preferred web browser and navigate to the following URL: https://bootstrap.pypa.io/get-pip.py
This URL hosts the script needed for PIP installation. Once on the page, right-click and select “Save As” to download the get-pip.py script to your computer. Ensure that you save the script in a location easily accessible from the Command Prompt, as we’ll be navigating to this directory shortly.
Downloading the get-pip.py script is a pivotal step, as it provides the necessary components for executing the installation of PIP on your Windows machine. As we move forward, this script will be executed in the Command Prompt to automate the PIP installation process.
Take a moment to appreciate the simplicity of this step – downloading a single script that streamlines the installation of a powerful tool for managing Python packages. With the get-pip.py script securely stored on your computer, you’re well on your way to enhancing your Python development experience on Windows 10.
Step 5: Run PIP Installation Script
Now that you’ve successfully downloaded the get-pip.py script, the next step is to run this script in the Command Prompt to initiate the installation of PIP on your Windows machine. This step is where the magic happens, automating the process and integrating PIP seamlessly into your Python environment.
Begin by navigating to the directory where you saved the get-pip.py script. In the Command Prompt, utilize the ‘cd’ command followed by the path to the directory. For example:
cd path\to\directoryReplace “path\to\directory” with the actual path where you saved the get-pip.py script. Once you’re in the correct directory, it’s time to run the script. Execute the following command:
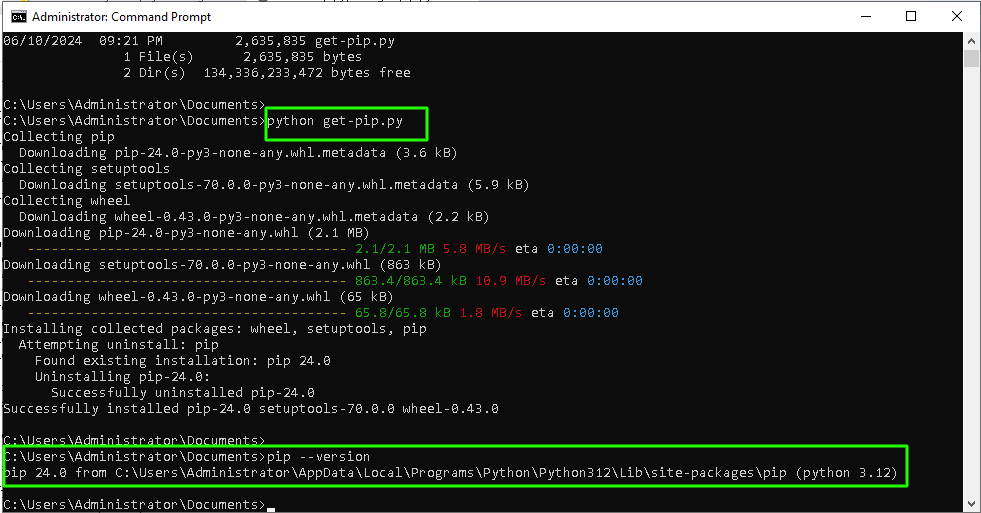
python get-pip.pyThis command triggers the execution of the get-pip.py script, initiating the installation process for PIP on your Windows machine. As the script runs, you’ll see various messages indicating the progress of the installation. Upon completion, you should see a confirmation message, indicating that PIP has been successfully installed.

Step 6: Verify PIP Installation
Now that PIP has been installed on your Windows 10 system, it’s essential to perform a quick verification to ensure a successful integration. This step adds an extra layer of confidence that PIP is recognized and ready to serve as your Python package manager.
In the Command Prompt, type the following command:
pip --versionExecuting this command will show information about the installed version of PIP. If PIP is installed aptly, you’ll see details such as the version number, indicating that PIP is now operational on your Windows machine.
This verification step is crucial as it provides immediate feedback on the status of the PIP installation. In case of any issues, error messages or a failure to recognize the ‘pip’ command may indicate a problem with the installation process. In such cases, revisiting the installation steps or seeking assistance online can help troubleshoot and resolve any issues.
Congratulations on successfully navigating through the steps to install PIP on Windows 10! You’ve now equipped your Python environment with PIP, enabling you to effortlessly manage Python packages for your projects. With PIP in your toolkit, exploring and integrating third-party libraries and modules becomes a seamless part of your coding journey.
Also Read: How to Enable or Install Telnet on Windows 10 or 11?
Conclusion
In this guide, we’ve walked you through the process of installing PIP on Windows 10, allowing you to harness the full power of Python for your projects. With PIP, you can easily install and manage third-party packages, making your Python development journey smoother. Now that you have PIP set up, discover the vast Python ecosystem and level up your coding proficiency to elevated heights.