Introduction
Management is an essential component of control and productivity. In the world of computers, the control factor depends on the operating system. An operating system allows the user to take control of the computer, and Linux is an excellent example of this OS. It helps complete various computing tasks by managing the hardware and software components of the computer.
Do you know the entire management task requires proper space on the disk? So, how does Linux manage this space allotment? The term “partitioning” supports data organization. So, Linux creates partitions in order to manage the computer.
In this article, we will discuss the important elements of partitioning in Linux. We will also discuss the importance of partitioning and how Linux creates partitions through the “fdisk” and “parted” commands. This informative piece will help you discover how to format and mount partitions, which are crucial steps to making partitions usable. Get ready to dive into the world of Linux disk partitioning!
Why Is Partitioning Important for a Linux Operating System?
Data organization is important, regardless of its mode. Linux organizes data for a computer through the process of partitioning. Before we dig deeper into how Linux partitions, let’s look at the importance of this process.
Organizing Data:
Partitions help in organizing data by separating different types of files and system areas. For example, you might have one partition for the operating system, another for user data, and another for system backups.
Managing Space:
By partitioning a drive, you can allocate specific amounts of space for different purposes. This can help prevent the operating system from filling up all available space and keep data organized.
System Stability and Recovery:
Keeping the operating system on a separate partition from user data can improve system stability and make it easier to recover data in case of a system failure or reinstall.
Multi-Boot Systems:
The partition approach is highly beneficial in cases of multi-OS requirements. Yes, a user can install multiple operating systems when Linux creates a partition.
Performance and Security:
Different partitions can improve performance by reducing fragmentation and can enhance security by isolating sensitive files.
System Recovery:
Assume there is a box with four separations. Each separation has a different spice power. Now, by mistake, water gets spilled in one of the separate parts. Will the other three separations get wet? The answer is no because there is a clear separation in the box. In a very similar way, a partition on a system saves the data and allows for quick recovery.
Do you know that Linux without disk partition implementation can be risky for data? Yes, it can lead to data loss or very low flexibility in system organization. Hence, it is highly important to create a partition in Linux.
Partition Disk Using The fdisk Command
The fdisk command is the most appropriate choice when a user sets up a new disk in Linux. Go through the following steps to use the fdisk command to create a partition:.
Step 1: List Available Disks
Many systems have multiple disks. As a user, you don’t want to confuse them. So, the very first step is to list the available disks to identify the right one.
sudo fdisk -l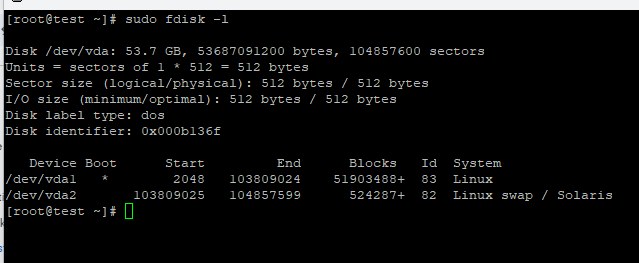
Step 2: Start fdisk on the Target Disk
Once the right disk has been identified, the next step is to start the fdisk command on it. In order to do so, you will have to use the following command.
sudo fdisk /dev/sdb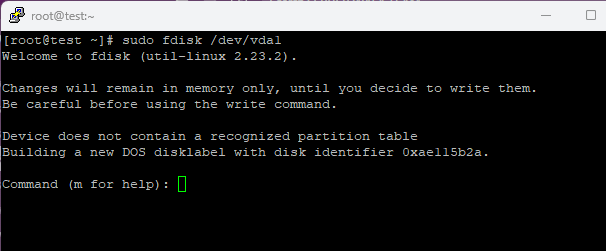
In the above command, the term “/dev/sdb” is generic. Here, you need to switch it with the correct disk identifier.
Step 3: View Existing Partitions
Creating partitions in Linux is a complex process if it is not done correctly. It is always advisable to check the existing partitions first. This leads to knowledge about the available disk space and the prevention of important data. Overall, it is a great way to prepare for backup. You can view the existing one by entering the following command:
P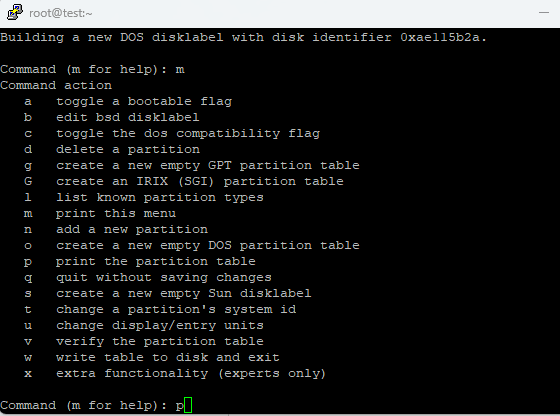
Step 4: Create a New Partition
Now, with all the information you have just gone through, you are ready to partition a disk in Linux. Implement the following command to do so:
n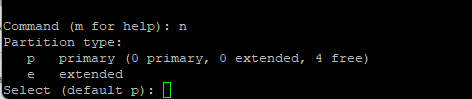
The creation process will begin when you enter the “n” command. Moving on, you will have to use the command below to select the partition type. The type usually indicates the role and usage of the partition. There are different types of partitions, including primary, extended, logical, and so on. Here, we will go with the primary partition.
p
The next thing to specify is the newly created separation with a number. This is important in order to create a unique identity. The common range of primary partitions is from 1 to 4. So, we will enter the number “1” in the command-line interface.
1
The last step in partition creation is related to size. You need to enter a specific number in the CLI in order to create a particular size of the partition. For example, here you can enter “+20G” in the CLI. Once you press enter, a 20-GB separation will be available for you.
Step 5: Write Changes to the Disk
Now, the above changes are temporary until you write them with the following command:
W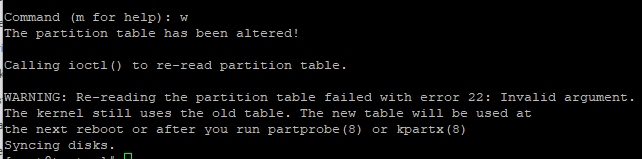
That’s it; your partition in Linux is ready to use!
Partition Disk Using the Parted Command
The parted command is another tool for managing disk partitions in Linux, offering more advanced options than fdisk. Follow these steps to use the command “parted” to create a partition:
Step 1: List Available Disks
Just like how we first identified the existing partitions in the fdisk part, we will do the same here. This will help us identify the right disk for the process. You can do so by using the following command:
sudo parted -l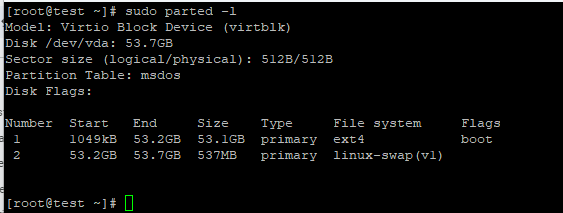
Step 2: Start the Parted Command on the Target Disk
Once you’ve identified the correct disk, start the parted command for that disk. Replace /dev/sdb with your actual disk identifier. This step is also similar to the fdisk one.
sudo parted /dev/sdb
Step 3: View Existing Partitions
To see the existing partitions and available space, use the print command. This helps in understanding the current disk setup.
printStep 4: Create a New Partition
Now, it is time to create a new partition through the parted command. Take a look below.
- Select Partition Type: Choose between primary or logical partitions. For this example, we will create a primary partition.
Mkpart
- Specify Partition Type and File System: Enter the type of partition (primary, extended, etc.) and the file system type if prompted.
mkpart primary ext2 1MiB 20GiB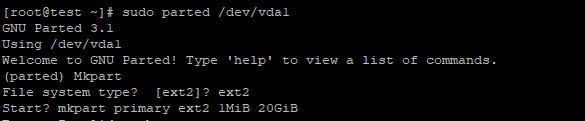
This creates a primary partition formatted with ext4, starting at 1 MiB and ending at 20 GiB.
Step 5: Verify and Apply Changes
Once everything is done, you need to ensure there are no hiccups. Check the new partition setup to ensure it meets your requirements.
printIf everything looks good, the changes are automatically saved. You don’t need to use a separate command like w in fdisk to write changes, as parted applies changes immediately.
Format Partition
Now that you have created a partition in Linux, your next action should be to perform the format. Why is it important? The format approach ensures the proper deployment of a file system on the disk. This helps organize the data. To do so, you will have to use the “mkfs” command.
Step 1: List Existing Partitions
The format process, too, requires the user to list the existing partitions. This will help identify the right disk to format. Use the below command to do so.
sudo fdisk -l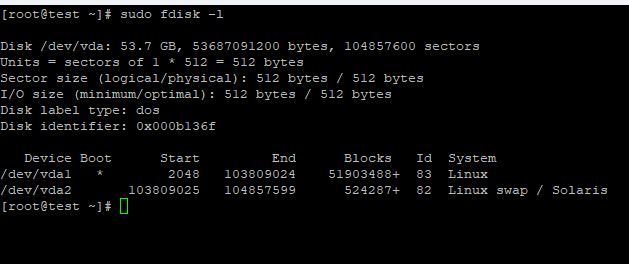
Step 2: Choose the Correct Partition
Identify the partition from the list you wish to format. For this example, let’s assume the partition you want to format is /dev/sdb1.
Step 3: Format the Partition
Use the mkfs (make file system) command to format the partition. You can choose different file system types depending on your needs. Some common examples of file system types are ext4, xfs, ntfs, etc.
- For ext4 File System: Command:
sudo mkfs.ext4 /dev/sdb1
- For xfs File System: Command:
sudo mkfs.xfs /dev/sdb1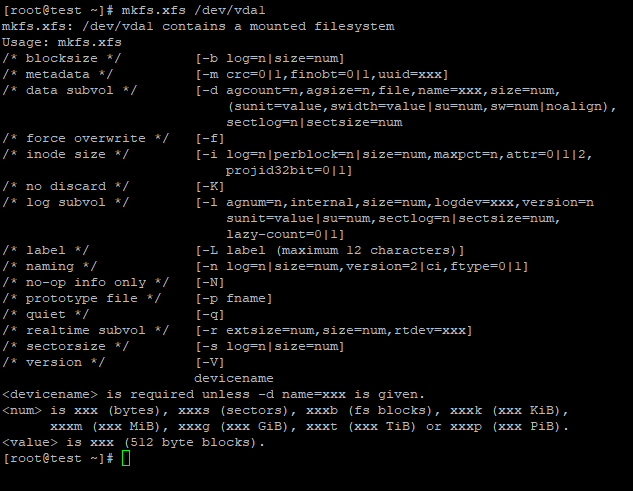
- For ntfs File System: Command:
sudo mkfs.ntfs /dev/sdb1Step 4: Verify the Formatting
Once the formatting steps are done, you need to ensure that the process goes smoothly. Enter any of the below commands to do so.
sudo blkid 
or
lsblk -f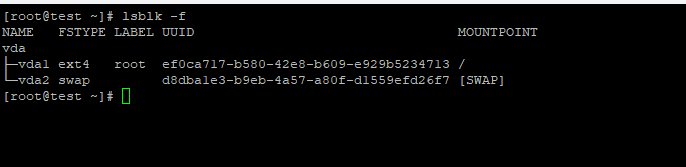
The above steps will complete the format process for the user in a simplified manner.
Also Read: How to Format a Disk in Linux/Ubuntu OS?
Mount Partition
Now, we have created a new partition and saved the changes, but next, what? Can we use it? Well, there is one last important thing that needs to be done. You need to mount the partition, which attaches the partition to the directory. This will help you to read and write the separation without any issues. Here’s a step-by-step guide to mounting a partition in Linux:
Step 1: List Existing Partitions
Before mounting, list the existing partitions to identify the one you want to mount.
sudo fdisk -l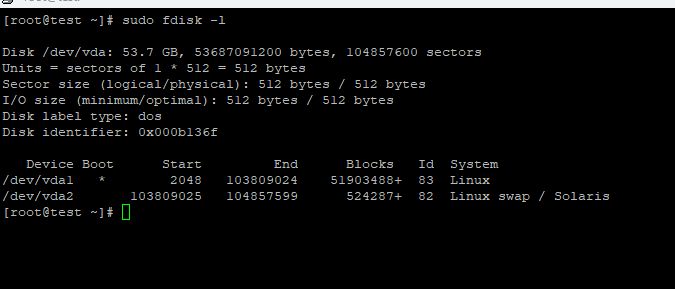
Step 2: Create a Mount Point
A mount point is a directory where the partition will be attached to the file system. You need to create this directory.
sudo mkdir /mnt/my_partition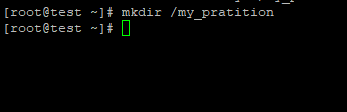
Step 3: Mount the Partition
Use the mount command to attach the partition to the mount point.
sudo mount /dev/sdb1 /mnt/my_partition
Step 4: Verify the Mount
Check that the partition is mounted correctly and is accessible.
df -h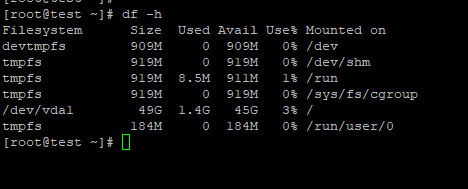
Step 5: Access the Partition
Navigate to the mount point to access the files on the partition.
cd /mnt/my_partition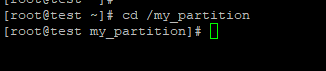
Step 6: Unmount the Partition
When you’re done using the partition, you can unmount it. This is necessary before disconnecting the disk or making changes.
sudo umount /mnt/my_partition
Conclusion
Linux is an amazing operating system that works with clear partitions. In this article, we discussed the importance and concept of partition creation in Linux. We shed light on how a disk is partitioned and how it leads to proper data organization. Here, we talked about how these partitions are managed. Our informative piece perfectly elaborated on the implementation of important commands like “fdisk” and “parted” in order to create a new partition. We shared the process of partition formatting and mounting in detail. Remember that each step is important to make sure your data is organized. So, next time you need to set up a new disk or reorganize an old one, remember these steps to get it done right!